> For the complete documentation index, see [llms.txt](https://docs.console.zenlayer.com/welcome/llms.txt). Markdown versions of documentation pages are available by appending `.md` to page URLs; this page is available as [Markdown](https://docs.console.zenlayer.com/welcome/cloud-networking/get-started/create-a-layer-3-connection/select-a-public-cloud-as-access-point.md).
# Public Cloud Access Type
Zenlayer Cloud Networking supports connections to multiple mainstream public cloud providers. Because the integration mechanisms differ, the access process falls into three types. Choose the one that
Public Cloud Connection
Zenlayer Cloud Networking currently supports connections to multiple **mainstream public cloud providers**: Amazon Web Services (AWS), Tencent Cloud, Google Cloud, Alibaba Cloud, Huawei Cloud, Microsoft Azure, Oracle Cloud, and BytePlus. Because the integration mechanisms differ across public clouds, the access process falls into three types. Choose the one that matches your public cloud.
## Common Steps
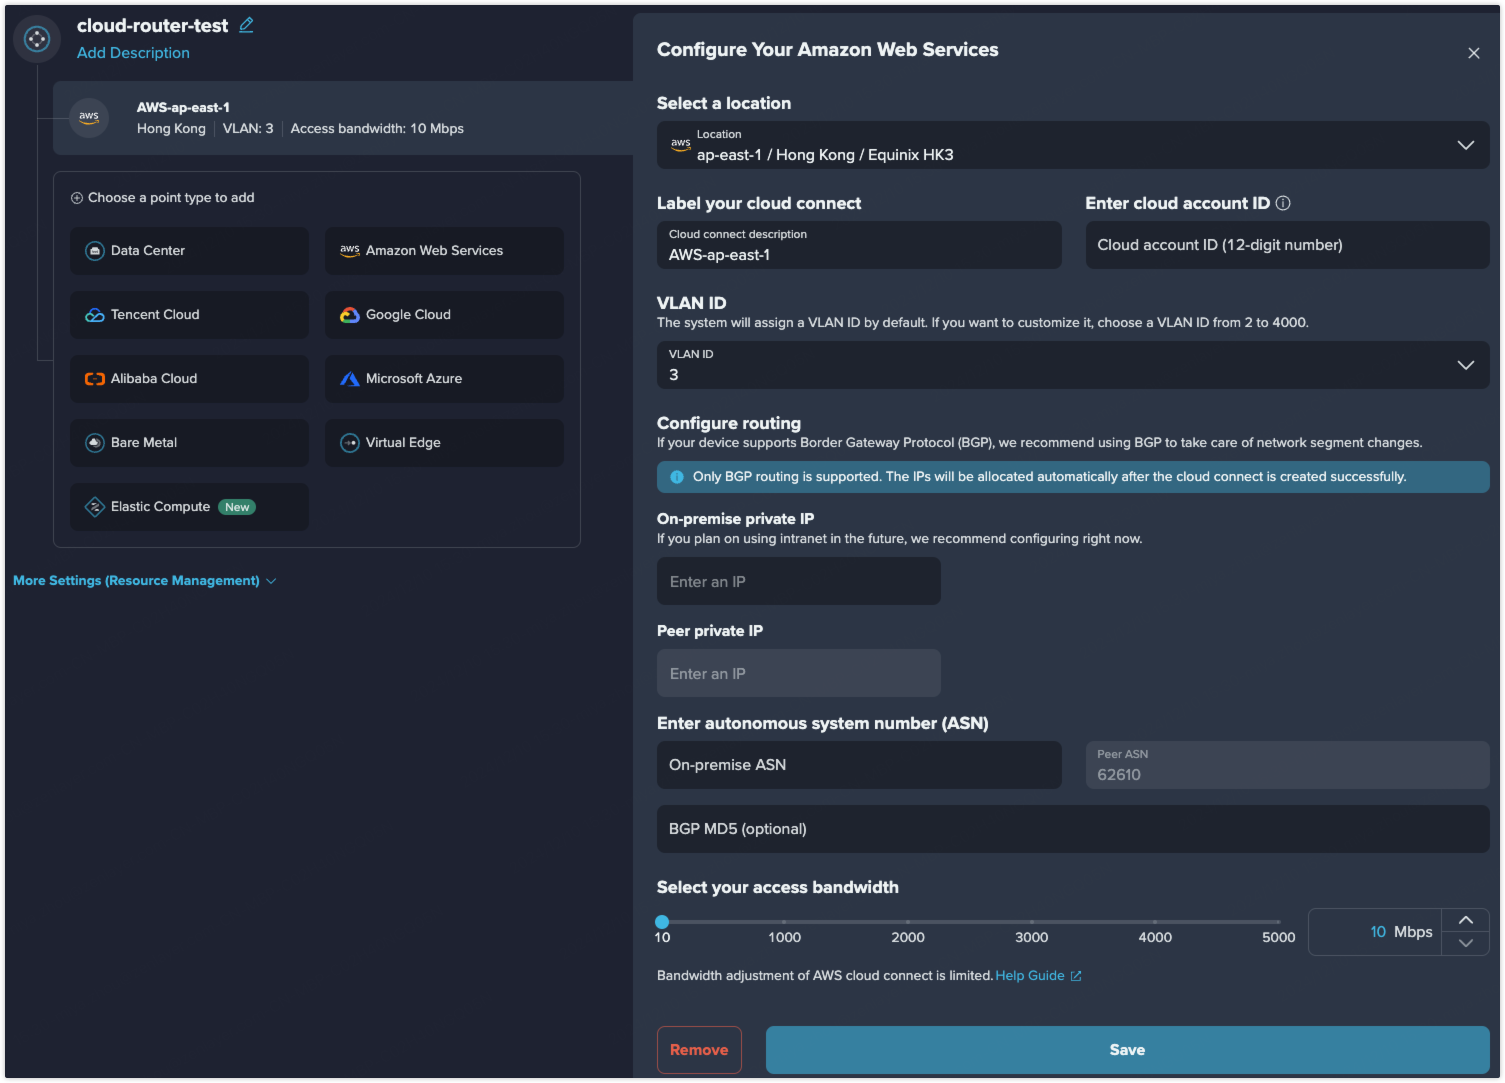
When creating a public cloud access point on zenConsole, you usually need to complete the following basic configuration:
1. Select your public cloud provider.
2. Select the cloud OnRamp closest to your infrastructure on the public cloud to guarantee high network performance.
3. Label your cloud connect for identification.
4. Enter your cloud account ID or key, depending on the selected public cloud (see the corresponding process below).
5. Configure the VLAN ID: The system does not assign a VLAN ID by default; you need to specify one as needed, within the range of 2 to 3499. The system only offers currently available VLAN IDs, filtering out those already in use. Data will be transmitted in the corresponding VLAN.
{% hint style="info" %} **Note**
* If all locations are too far away, please contact Zenlayer support to create your new cloud connect.
* If your public cloud provider is not supported for now on zenConsole, please contact Zenlayer support.
* For Tencent Cloud, the VLAN ID ranges from 2 to 3000.
{% endhint %}
## Access Processes
Based on the integration mechanism, public cloud access falls into the following three processes.
### Process 1: Zenlayer Pushes, You Confirm on the Public Cloud
**Applicable public clouds: AWS, Alibaba Cloud, Huawei Cloud, BytePlus**
1. On zenConsole, create the public cloud access service and enter your cloud account ID, VLAN, interconnection IP, ASN, and other information.
2. After you submit, Zenlayer — as a partner of the public cloud — pushes the connection information to your public cloud account.
3. Log in to the corresponding public cloud platform and accept the connection to complete the access.
{% hint style="info" %} For some AWS and Alibaba Cloud locations, you need to submit a Cloud Service Request on zenConsole first to activate the cloud service there.
{% endhint %}
### Process 2: Generate a Key on the Public Cloud, Enter It on zenConsole
**Applicable public clouds: Google Cloud, Microsoft Azure, Oracle Cloud**
1. Generate a connection key on the corresponding public cloud platform as needed:
* **Google Cloud**: a [**pairing key**](https://cloud.google.com/network-connectivity/docs/interconnect/concepts/terminology#pairingkey).
* **Microsoft Azure**: a service key (s-key). An s-key is a standard GUID that uniquely identifies an ExpressRoute circuit. It is the only piece of information exchanged between Zenlayer, Microsoft Azure, and you; it is not a secret for security purposes, and there is a 1:1 mapping between an ExpressRoute circuit and its s-key.
* **Oracle Cloud**: a connection key generated as required on the Oracle platform.
2. Enter the key in the configuration of the corresponding public cloud on zenConsole. Zenlayer will find the closest location to match according to the key, so please ensure the format is correct.
3. Select the specified location to complete the creation of the access service.
See [**Validate Cloud Connection**](/welcome/cloud-networking/get-started/validate-connection-in-public-cloud.md) to learn how to obtain the key for each public cloud.
### Process 3: You Push, Zenlayer Verifies and Auto-Accepts
**Applicable public cloud: Tencent Cloud**
1. On zenConsole, select the location you need and create the public cloud access service.
2. After the service is created, initiate a connection push on the Tencent Cloud platform based on the information Zenlayer provides.
3. Zenlayer will verify against the information and, once it passes, automatically accept the connection to complete the access.
{% hint style="info" %} **Note**
* The verification information on the Tencent Cloud side includes the **Cloud account ID**, **Shared tunnel ID**, and **VLAN ID**. All three must exactly match the information Zenlayer provides; otherwise, the verification fails.
* Create a new push on the Tencent Cloud platform instead of using an existing connection. If you need to make changes, initiate the push again.
{% endhint %}
## What to Do Next
[**Validate your cloud connect**](/welcome/cloud-networking/get-started/validate-connection-in-public-cloud.md) on the corresponding console of your public cloud provider.