> For the complete documentation index, see [llms.txt](https://docs.console.zenlayer.com/welcome/llms.txt). Markdown versions of documentation pages are available by appending `.md` to page URLs; this page is available as [Markdown](https://docs.console.zenlayer.com/welcome/cloud-networking/get-started/create-a-port.md).

# Create a Port

Create a physical interface for your data center to connect to cloud networking, available as a Standard Port or an Unlimited Port.

## Background Information

Ports provide the access points, while cross connects create the physical link between these points. For example, in a data center, your server has a port that connects to a switch via a cross connect. The switch may then connect to other network devices or external providers, allowing data to flow between systems.

We support two kinds of ways to build the cross connect needed for your port: **Self-Build** and **Assisted Build**. View [**Create a Cross Connect**](/welcome/cloud-networking/get-started/create-a-port/create-a-cross-connect.md) for details.

## Port Types

When creating a port, you can choose between two port types based on your business scale and network needs:

* **Standard Port**\
  A standard physical access port suitable for most general access scenarios.
* **Unlimited Port**\
  Building on the Standard Port, it supports **higher port rates** for bandwidth-intensive, high-throughput scenarios. In addition, the Unlimited Port comes with **free metro backbone**, meaning backbone traffic within the same city incurs no extra charge, helping you reduce cross-facility interconnection costs.\ <img src="https://3201622183-files.gitbook.io/~/files/v0/b/gitbook-x-prod.appspot.com/o/spaces%2F9X3FDdkCL2HzhbPpPMFt%2Fuploads%2Fgit-blob-5961bea9ac389c1aa2f03164b5622f10a99895e1%2FIcon.svg?alt=media&amp;token=b85eac46-fd05-4800-aa2b-8db408b8af26" alt="" data-size="line"><mark style="color:blue;">**Note**</mark>\ <mark style="color:blue;">- The Unlimited Port currently supports Layer 2 connections only; Layer 3 connections are not yet supported.</mark>\ <mark style="color:blue;">- The Unlimited Port is currently available for purchase in the Singapore region only, but its cross-city connectivity is not affected and is not limited to use within Singapore.</mark>

## Connection Types

The physical link between your equipment and the Zenlayer port takes one of two forms:

<figure><img src="https://3201622183-files.gitbook.io/~/files/v0/b/gitbook-x-prod.appspot.com/o/spaces%2F9X3FDdkCL2HzhbPpPMFt%2Fuploads%2Fgit-blob-d996cfece51ed34084e7130212b185949f5e1b7b%2Fconnection-types.svg?alt=media" alt=""><figcaption><p>Cross connect and campus connect</p></figcaption></figure>

* **Cross connect**\
  Your equipment and the port sit in the same building — the one hosting the Zenlayer PoP — so cabling inside the facility is all it takes.
* **Campus connect**\
  Your equipment sits in another building on the same campus. Zenlayer's **Extended** coverage reaches those facilities, and the link is made of a campus span plus in-building cabling, ordered as its own connection type.

When you pick a data center while creating a port, the ones marked **Extended** are the campus connect ones. Both connection types support self-service and assisted builds, and both need an LOA.

## Procedures

On the upper left corner of zenConsole, go to **Products** > **Cloud Networking** > **Port** > [**Create Port**](https://console.zenlayer.com/sdn/port/create).\
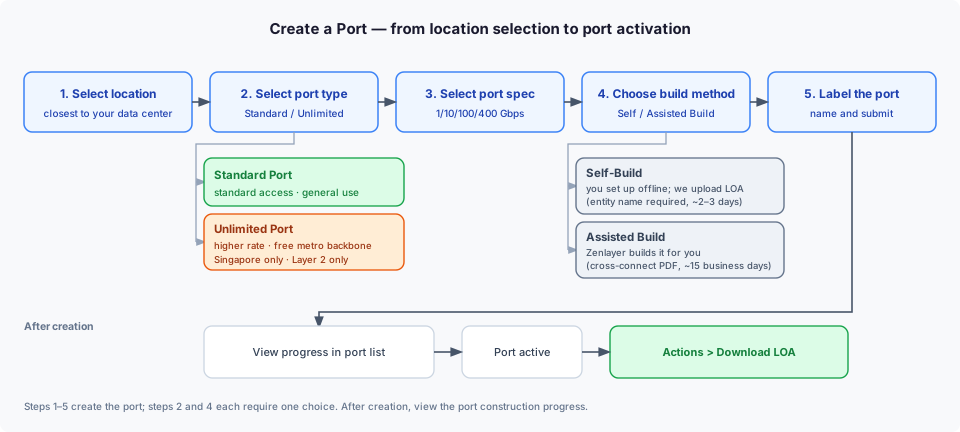
The overall steps of creating a port is shown below.

<figure><img src="https://3201622183-files.gitbook.io/~/files/v0/b/gitbook-x-prod.appspot.com/o/spaces%2F9X3FDdkCL2HzhbPpPMFt%2Fuploads%2Fgit-blob-01a38e37b6c9967344d5e9eb19c0152670081a80%2Fcreate-port-flow.svg?alt=media" alt=""><figcaption><p>Create a Port Flow</p></figcaption></figure>

1. Select the region and data center closest to your equipment.

   A data center marked **Extended** in the list is not the building hosting the Zenlayer PoP — it is reached through **campus coverage**. Picking one means the link runs over a **campus connect**; every other data center uses a **cross connect**. See [Connection Types](#connection-types).
2. Select the port type: **Standard Port** or **Unlimited Port**.

   Choose the Unlimited Port if you need higher port rates and free metro backbone (currently available in the Singapore region only). See [Port Types](#port-types) for details.
3. Select the port specification. 1 Gbps, 10 Gbps, 100 Gbps and 400 Gbps are supported.\ <img src="https://3201622183-files.gitbook.io/~/files/v0/b/gitbook-x-prod.appspot.com/o/spaces%2F9X3FDdkCL2HzhbPpPMFt%2Fuploads%2Fgit-blob-5961bea9ac389c1aa2f03164b5622f10a99895e1%2FIcon.svg?alt=media&amp;token=b85eac46-fd05-4800-aa2b-8db408b8af26" alt="" data-size="line"><mark style="color:blue;">**Note**</mark>\ <mark style="color:blue;">To future-proof your business, a 10 Gbps above port rate is recommended.</mark>
4. Select the connection type and the build method.

   The connection type follows the data center of the port: in-building access is a **cross connect**, and same-campus access in another building is a **campus connect**. Both support the two build methods below:

   * **Self-Build**\
     You'll set up the cross connect offline by yourself. You need to provide the legal business name of the authorized party. We will upload the LOA (letter of authorization) for you to establish your cross connect.\ <img src="https://3201622183-files.gitbook.io/~/files/v0/b/gitbook-x-prod.appspot.com/o/spaces%2F9X3FDdkCL2HzhbPpPMFt%2Fuploads%2Fgit-blob-5961bea9ac389c1aa2f03164b5622f10a99895e1%2FIcon.svg?alt=media&amp;token=b85eac46-fd05-4800-aa2b-8db408b8af26" alt="" data-size="line"><mark style="color:blue;">**Note**</mark>\ <mark style="color:blue;">**-**</mark> <mark style="color:blue;">Entity name for LOA should match the name registered with the colocation facility.</mark> \ <mark style="color:blue;">- It will take</mark> <mark style="color:blue;">2 to 3 days to upload LOA.</mark>\
     \- <mark style="color:blue;">The LOA will expire in 30 days. Please establish your cross connect as soon as possible.</mark>\ <mark style="color:blue;">-</mark> <mark style="color:blue;">If you encounter any issues beyond your control, you can also create a cross connect on zenConosle.</mark>
   * **Assisted Build**\
     Zenlayer will build the cross connect for you offline. You need to provide a valid PDF file including your cross connect location and build method, as well as your contact information.\ <img src="https://3201622183-files.gitbook.io/~/files/v0/b/gitbook-x-prod.appspot.com/o/spaces%2F9X3FDdkCL2HzhbPpPMFt%2Fuploads%2Fgit-blob-5961bea9ac389c1aa2f03164b5622f10a99895e1%2FIcon.svg?alt=media&amp;token=b85eac46-fd05-4800-aa2b-8db408b8af26" alt="" data-size="line"><mark style="color:blue;">**Note**</mark>\ <mark style="color:blue;">It usually takes</mark> <mark style="color:blue;">15 business days to construct the cross connect. Please be patient.</mark>

   View [**Create a Cross Connect**](/welcome/cloud-networking/get-started/create-a-port/create-a-cross-connect.md) for details.
5. Label your port for identification.